Tuesday, July 8, 2014

Cloud Peak Wilderness


Cloud Peak Wilderness Area is located just a few miles from Buffalo, Wyoming, and stretches 27 miles along the Bighorn National Forest.  Cloud Peak is the tallest summit in the Bighorn Mountain Range at 13,167 feet.  However, our goal was not to reach the summit but rather hike to various lakes and survive almost a week in the wilderness with whatever we could pack in and later catch for food.    The areas we went to were remote and private, not seeing another human being for days. 

Why Cloud Peak?  Well, after setting out to climb Pike’s Peak last summer with my buddy Al Beilgard, Al suggested a wilderness adventure in lieu of mountain climbing this year.  Al and his wife, Nancee, had lived in north central Wyoming for many years and this is a place he was familiar with, albeit 24 years had passed since his last trek.   

Our journey began at the Circle Park trailhead and for the most part stayed on trail 046 until the last leg and took trail 090 to Old Crow Lake.  Unlike the Barr Trail going up Pike’s Peak which is practically paved and very wide, these trails were very narrow, rocky, and would peter out in several places leaving you to look for cairns and blazes for signs of which direction to go. 

There are several hundred beautiful lakes cover the landscape and drain into miles of streams. The area is characterized by an attractive mix of pine and spruce opened by meadows and wetlands. 
And since they were having what the ranger describes as a “late spring”, that meant there is still snow and drifts to contend with.  Snow drifts at times would impede our path.  Being too long and deep to cross we would have to go around and then pick up the trail again later.  Some times this proved to be a challenge. 

I mentioned the trails being rocky.  Boulders would probably be a better term than rocks.  Navigating them gave us “dead legs”.   And unlike the Barr Trail that starts out with quick, short switchbacks for a mile or so leading to an elevation climb of over a 1000 feet in that short span, this trail tended to rise and fall, gently ascending over several miles.    I estimate we hiked about 6 miles or so reaching Old Crow Lake in about five and a half hours.  We took our time, took breaks, took lots of pictures, took a wrong turn, and got lost for about an hour.  

But we planned for being lost and had a compass and a topographical map to help us find our way again.  No worries.

 
Sherd Lake is the first major lake we came to about two miles in.  All of the lakes are glacier lakes and are very clear.  Some are shallow all across and some have a short shelf and drop off like an ocean.  In the distance is Cloud Peak.

 Snow drifts!  Large, long snow drifts covering our trail.  And what you cannot see is that Rainy Lake is behind here but we could not access it until we came back on our way out.  The warmer weather and rain we had everyday helped melt some of it away and cleared a path to the lake. 

This is Otter Lake and we are about two-thirds of the way to our destination.  Off to the right the area opens up to a meadow and wetlands. 


This is one of many streams we had to cross.  And because of the amount of rain we had, this stream would be much higher and there were many more streams to navigate on our way back down.  This is just about the time that we get lost.  The trail just seemingly ends amongst the wide meadow and wetlands.  Two cairns about 40 yards apart were the only signs but didn’t clearly mark the direction of our trail.  A third cairn would have been nice.  We started out in a couple different directions but couldn’t find where the trail started back up.  We ended up climbing a ridge to try and get a view but there was too much thick timber to see much.  This is where the topographical map really came in handy.  We were able to discern which ridge we were on in relation to Otter Lake and the many ponds surrounding us.  We used our compass to find our heading and started out again eventually picking up the trail.  And when I say lost it was not like we were wandering around.  For the most part we stayed still trying to sort it out.  Al and or I would walk a short distance in any one direction and come back.  We'd continue to check our map and compass until we got our bearing and set out.  All in all we lost about an hour. 


Boulder fields; some small and some large; some stretching across only a few yards and some for hundreds; some easier to manage then others.


Finally, we made it to Old Crow Lake.  It was a really beautiful place and the timber was not so thick with several clearings for setting up camp.  


This is the river flowing out of Old Crow Lake.  All of the glacier lakes are connected by rivers or streams that flow into one and out to another.  This one was rather large compared to others we saw and was not able to cross it. 


We used the snow drifts as a refrigerator.  We packed up eggs and sausage for our breakfasts.  Later we would bury our bounty of fish to preserve them till dinner.  Other than that, we had some granola/trail mix, a few tuna pouches and a few freeze dried meals. 

After setting up camp and settling in a bit, we headed down to the lake and on the very first cast…BOOM…the trout hit my jig as soon as it hit the water.  Wish I could say catching trout was as prolific as being one for one on every cast but we did all right.  

We were fortunate to have a fairly flat boulder to use as a counter top.  From left to right what you will see is a large pot resting on a small three prong folding stove that screws into a small red propane tank.  Next to it is a cover for the pot which doubles as a sink for washing out the pot and bowls.  In the middle of the picture are the bowls that are part of the set and then an additional stainless steel mess kit that we used for cooking the eggs and sausages.  Resting on the log behind it was our mini bar and water bottles.  That brown thing is Al’s Eddie Bauer aluminum frame backpack (circa 1971) and then trash bags he used to cover it when it rained.  I told him he should write a book from the perspective of the backpack because that thing has traveled and experienced a lot over the years. 
This is me preparing for a day hike into the unknown.  We will be bushwhacking our way and going off the grid.  And yes, we will get lost (again) but have no fear for I am prepared. On one hip I have my Shimano reel and telescopic reel (thank you brother, Jack) and on the other hip my Taurus Millennium G2 9mm pistol. 
Did I mention boulder fields?  This picture is taken atop a ridge overlooking a massive boulder field that stretches several football fields.  There is water running underneath portions of it and that patch of green trees in the middle is where a large concentration of it is at.  What you do not know is that this is the second ridge we climbed trying to find our way to Lame Deer Lake.  The first ridge was to the north of this.  When I got up it all I saw was more boulders and yet another ridge.  So we climbed back down and reassessed the situation.  Al looked up and eyed Cloud Peak.  In this next picture you can see a thin white snow trail coming down the middle of the mountain.  Al pointed to it and said, “Lame Deer is right there!”  Well “right there” means having to cross several hundred yards of boulders.  And when we finally crossed and zig-zagged our way up the big ridge, we found another boulder field.  And oh yeah, the side climbing up the ridge was also a boulder field. 


Exhausted we rested a bit before taking on the next boulder field.  But after 24 years, Al’s memory, slash intuition proved correct.

I figured out why they call it Lame Deer Lake.  You can hear the stream rushing out of the lake down the mountain side from a ways.  Deer having to cross those boulder fields to reach the water they are in search of no doubt injured themselves and died before ever reaching it. 
The lake itself was deep.  Surrounded by snow drifts and large boulders, you could see submerged boulders for about 4 feet out and then it just drops off to what looks like a bottomless lake.  The views were spectacular.  And like my first cast at Old Crow…BOOM…bagged a beautiful rainbow trout on my first cast.  I should give a special shout out to my brother-in-law, George “Bear” Eoannou (Greek, pronounced similar to iguana only the “G” is silent – that’s the best I can do) for making all my jigs.  The two that hit the most were the rooster tail and one I have no idea what it’s called, but it was bright orange.   In the deeper lakes we used jigs and in the shallower waters we used flies.


Unfortunately though, clouds rolled in about 45 minutes into our fishing and started turning dark so we high tailed it back down. I estimate we meandered about 3 miles up but coming down we stuck closer to the stream and shaved it down to about a mile.  Boulder fields are easier to manage going up then coming down, I will say that.  
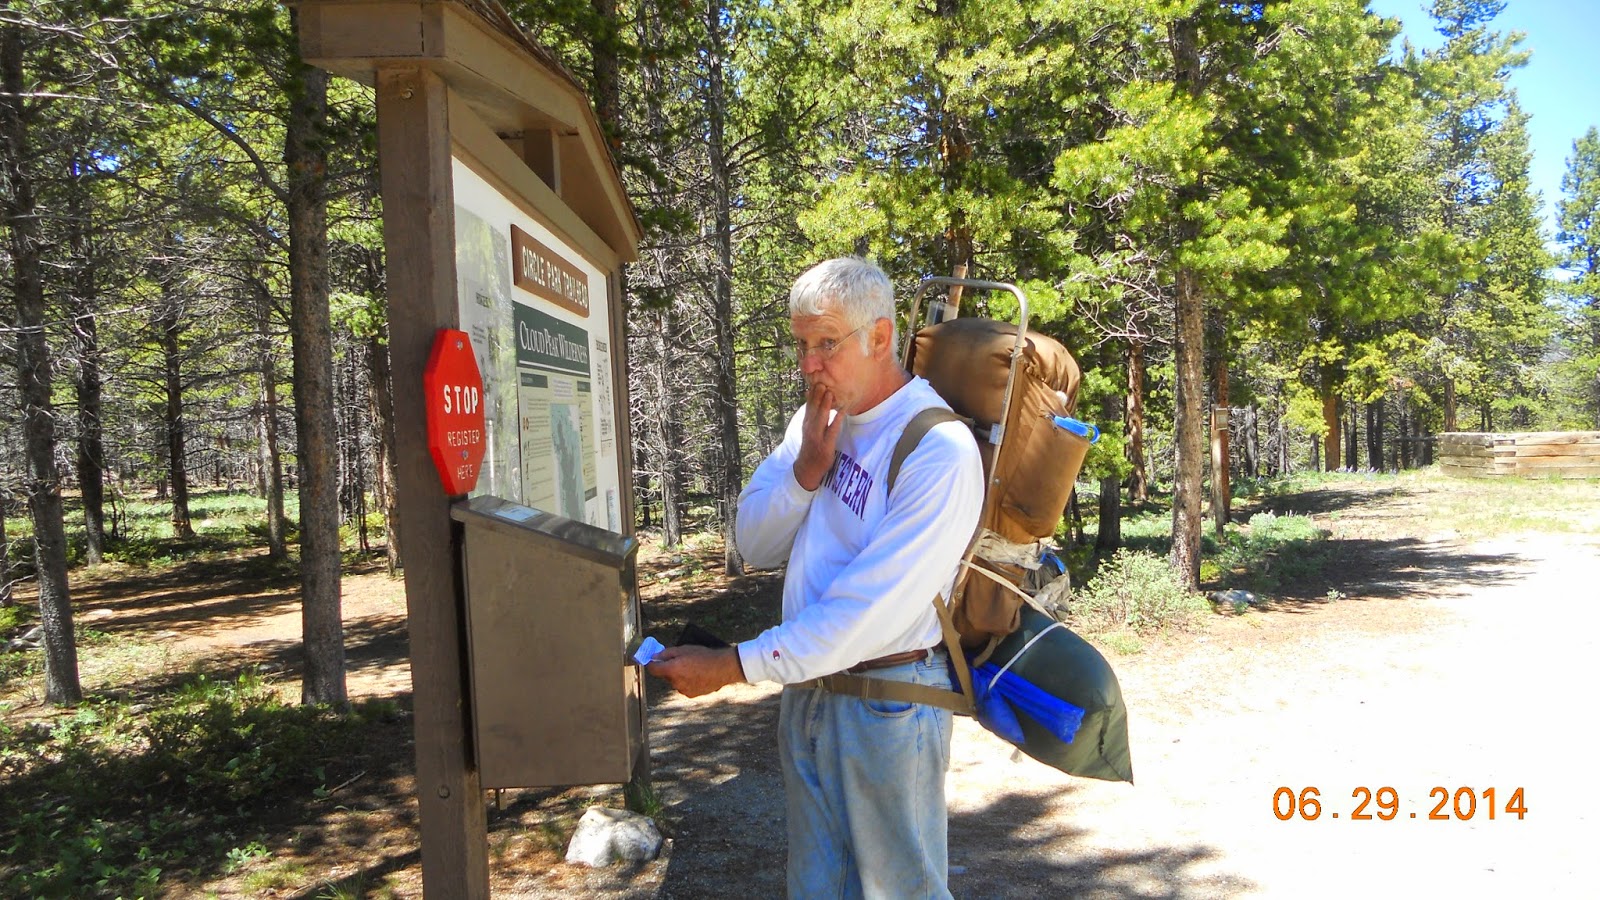
There are only a few rules when you are backpacking in protected, untrammeled wilderness.  One of the more important ones is to let the rangers know where you are going: how many in your party, your main destinations, how long, etc. We filled out the forms the night before.  I guess in our excitement the morning of our adventure we forgot all about that and discovered our mistake somewhere along our trek to Old Crow Lake.  So, better to submit our passes late then never at all, I guess.  I did email my parents and siblings to tell them where to look for our bodies prior to leaving the comfort of my home; so at least there was that. 
And so, that is some of the pictures taken and points of interest for us on our little wilderness journey.  I do, however, have some lessons learned, slash advice for would be wilderness adventurists.  I will put these in no particular order except for the first one which I feel is primarily the most important and profound. 

#1 – You are going to get lost!  It is just a fact.  Better to go in knowing this then to be blissfully blind to this fact.  Expect to get lost and then prepare for it.  At least then you may not freak out about it when you come to that realization that it is actually happening to you.  Now; Right now.  My advice is to relax; Take a deep breath; Recognize it is what it is (would it were what it isn’t); and, use some common sense and instinct.  A compass and a topographical map are musts.  In thick wilderness as we encountered with tall spruce and pine trees, some overcast skies, a trail that ends, it is hard to know your way.   You cannot see the sun as reference and you just get disoriented.  Trails are not straight paths.  They meander and go up and down, twisting, and turning sometimes in inexplicable ways because you do not know what is ahead of you.  Stop!  Take a look around you and look for blazes (carvings in trees that serve as markers) or cairns (pronounced “Karens” and are stacked rocks).  And if you are near running water (or can at least hear it), stick close to it.  Running water always leads to somewhere you want to be or go.   Plus, you need water to survive. 

#2 – Equipment is key.  I don’t know who is right between my backpack and Al’s vintage one.  They both served their purpose and got the job done.  Not sure what the liter size is of Al’s but its aluminum external frame made it easy to pack things like sleeping bag and tent on the outside and left plenty of room inside the pack.  The modern day ones like mine hold most everything inside and compresses everything to your body and bears the weight on your hips.  My pack was a Kelty Coyote 80 liter and I needed almost all of it for how long we were going. 
Besides the pack itself is what you pack inside it that makes the difference.  My semi-mummy sleeping bag was rated at comfortable to about 28 degrees and is waterproof.  Good thing too.  We tested both.  The temperatures for the most part stayed in the 30s at night but with all the rain and coming and going from the tent water would get in.  Speaking of the tent, it performed spectacularly.  The tent itself was water repellant and the cover was water proof.  The only part I was concerned with was the tent floor.  We had a lot of rain; a lot of rain.  She kept us safe and warm from the storms. 

Another key equipment was my water bottle.  I bought a new one this year which is a Camelback liter bottle with a UV light as a cap.  You charge it using a USB cable and treats up to 80 liters of water. on a single charge.  All you do is turn it on and then agitate for 60 seconds.  Brilliant! 

Lastly, I need to mention my hiking poles.  We saw a lot of people use them on their way up and down Pike’s Peak and I have to admit I thought this was some preppy hiking thing.  But talking to avid hikers they swore by them.  Nancee bought Al a pair for Christmas and that really got my interest peaked.  When I consulted the good folks at Sunflower Outdoor and Bike Shop in downtown Lawrence I was sold.  Best…investment…ever…for this kind of trip.  Using the hiking poles and my arms probably deflected up to 20% of the weight from my legs at any one time.  This is especially true climbing up when you can dig a pole in and help pull and push off.  Coming down it is more about control than anything else, I think. They saved me no less than 5 times from either face planting or falling backwards and that was just on the ascent.  Coming down is like a controlled free fall at times and the poles are nice to steady yourself and maintain that control. 

#3 – Cairns are your friends.  This goes with #1 above.  Be aware of your surroundings and look for signs.  Cairns are suppose to communicate to hikers but doubt many do.  For example, the higher a cairn is stacked the more peril.  Also, the top rock IS SUPPOSE TO indicate a direction but most do not.  Still, they are a most welcomed sight no matter how tall or small, no matter what.  If you see one, look closer and scan the area for an additional one.  Usually they are fairly close together to lead you in a direction (either the way you want to go or the way you want to return). 

My #4 piece of advice is “cotton kills”.  If Al never hears me say (or sees me write) that phrase again I am sure he will be happy and content.  It is my mantra when hiking/camping.  And it is true!  Cotton feels all so comfy and warm until it gets wet.  It does not have the ability to expel moisture.  Instead it traps it between it and you.  You will be cold and miserable and if temperatures are below freezing it really could mean very bad things for you; including ultimately your death. 
Every stitch of clothing I took was dry wick, water repellant or water proof, and even UV protected with SPF protection.  That last part was pretty important because of the elevations we were at and our exposure to the sun being magnified (when it wasn’t raining).  I was very dry and comfortable the entire time. Well, except for about 20 minutes when I fell into a stream coming back down.

There had been so much rain we encountered streams that were not there on the way up.  I am not sure what happened.  With streams you pick out rocks and clumps of grass to hop from and work your way across. Everything happened so fast and in slow motion at the same time if that makes any sense.  I was doing my hopping and somehow, some way my right foot ended up submerged calf high in the water.  As it was all happening and I was teeter tottering and trying to balance myself with poles, throwing my weight around and trying not to lose balance and fall in, I am doing this crazy Steve Martin like contortions.  I eventually went down.  And even though my socks were dry wick and boots water proof, when you submerge them as I ultimately did and face plant into a stream, water is going to get in.  But really I was fine.  My boot and socks didn’t slosh as you might expect.  The sock and boot both absorbed the water quickly and began to wick it away.  Al asked if I needed to stop and change socks and it was not needed.  When we got up to Rainy Lake (the one completely impeded by snow banks on our ascent) we stopped and I took that opportunity to change socks and let the soaked ones dry in the sun.  In about 20 minutes they were completely dry again.  Great gear! 
And I will give a shout out to Frogg Toggs.  My sister Deb told me about this rain suit last year before we hiked up Pike’s Peak.  They are paper light and completely water proof; plus, they breathe! They were awesome.  The only downside to them is they did not fold up and compress very well which means they took up a lot of space in my backpack. But they are an essential piece of equipment. 

So there you have it.  Cloud Peak Wilderness Area and I survived to tell about it.       


Wednesday, February 5, 2014

What Makes A Good Burger?


What Makes A Good Burger?
 
A simple question that seemingly invokes a complicated answer when posed, even controversy at times.  Perhaps if we could look to the sole source, the originator of the hamburger, the answer we seek could be found.  But the origination of the hamburger is controversial in and of itself.  There are no less than 3 proclaimers of its invention here in America all around the relatively same time period, including one of them being from Hamburg, New York.   Controversy aside, we know that at some point ground up steak was flattened, cooked, and placed between bread slices and this invention made its way here and has became a staple of American cuisine. 
 
I would like to say that I have solved the answer to this question and am prepared to share it here, but the complete answer still eludes me somewhat.  What I can share are some basic rules of a good burger that we may all agree upon and perhaps share some tips that I have learned (from mistakes I have made) on my quest to one day create the perfect burger. 
 
1.  Moo!
  
True enough.  You can make "burgers" out of salmon, turkey, elk, sausage, and so on, but a real all American burger comes from a cow.  And a better burger is made from ground chuck and not ground beef.  Reason: you really do not know what you are going to get with ground beef.  It is the left over beef and fat from processing.  It's fairly unregulated and so there is inconsistency in what you are purchasing. But, USDA regulations are that if it is labeled as "chuck" or "sirloin" then this the only part of the cow that is ground up and packaged.  Chuck comes from the shoulder region and is between 80-85% lean, or 15-20% fat.  Fat is good.  It is what makes the flavor and juicy goodness of a good burger.   
 
Even though it may only be chuck in the package, it does not mean it came from the same cow.  Commercial processing gets all mixed together.  If you want your meat to come from one cow, you will probably have to buy that cow from a farmer or rancher and have it processed locally.  Another option for knowing what you are really buying is to select your steak and either grind it up yourself or have the store butcher do it. 
 
About the only other thing I will say about beef is that organic is better.  There is a distinct difference in the taste of beef from one that is commercially raised and processed than one that is void of hormone steroids, antibiotics, etc. 
 
2.  Keep It Cold
 
Keep the beef in the fridge and as cold as possible until you are ready to form your patties.  Then form them quickly and get to cooking.  When the beef gets warm it becomes pliable and the fat begins to break down and will adhere to your hands and to your working surface.  This is bad.  You need the fat for juiciness and if it is on your hands it is not in the burger - which means your burgers are going to be dry. 
 
3.  Don't Over Handle
 
Yes, you can over handle the beef.  The more you pull, pinch, and knead the more you change it structurally.  This also takes time which means your beef is getting warm and we already discussed what happens then. Over kneading will dry your beef out and make your patties tough.  Just one or two pats and move on.   
 
But what about adding onions, peppers, cheese crumbles, bread crumbs, and whatever else to the beef?  Go ahead if you are making a meatloaf sandwich.  Again, you are structurally changing the beef when you do so and will have a harder time keeping the formed patty to stay, well, formed.  It also requires a lot of kneading and handling which, as we have discussed, will pull the fat out. 
 
4.  Conformity
 
Conformity.  Consistency.  Formed patties should be the same size and weight.  If not, it is going to make your job of cooking consistency very difficult.  The only way to accomplish this is to measure somehow.  You can use a food scale but then you still have to form the patty and you can still have inconsistency in thickness.  Therefore, I prefer to use a hamburger press.  The one I use is made of iron and the top screws up and down to adjust for the desired size of the patty.  Some wax paper and a little spray oil is all you need and this prevents my warm hands from over handling the beef which causes a breakdown in the fat.  Patties come out well formed and consistently sized every time. 
 
And when doing larger patties (1/3 pound or bigger) you may have experienced the patties to draw up into a ball.  You can avoid this by simply making a dimple on one side.  Use your thumb or a 1/4 tsp measuring spoon to make the indentation. 
 
 
I really do not understand the science behind this little trick, I just know that it works.  
 
 
5.  Seasoning
 
Absolutely seasoning is needed and even required.  There are not many rules when it comes to seasoning the beef but there are a few that need emphasizing. 
 
One, do not mix the seasoning into the meat.  You will never get it consistently mixed through out and you will only over handle it trying.  If your goal is to have it mixed into the meat, the only proper way to do so is to do it as you are grinding the meat.  But most people do not have a meat grinder so just season the formed patties right before cooking them. 
 
Two, season liberally.  I never worry about over seasoning.  I worry more about what seasoning I am using.  It doesn't have to be elaborate.  In Austin, Texas, BBQ rub consists of salt, pepper, and ground cayenne; that's it.   At the very least use salt and pepper.  I prefer fresh cracked pepper from my pepper mill as opposed to ground pepper from a store bought shaker.  Much more flavorful.  And use either Kosher salt or sea salt that is coarsely ground.  It is easier to take a pinch and control even distribution.  Whether you are using your own seasoning blend or one you purchase, season each side just before cooking.  It is really a matter of taste. 
 
Three,  never mix salt into the meat.  Salt immediately starts breaking down the protein and absorbs the fat.  Breaking down protein means altering the texture.  Absorbing fat means drying out the meat.  Salt is the last thing you want to sprinkle on the patties and you want to do it just before cooking. 
 
Another tip: spray or brush on oil onto the formed patties.  This will help the seasoning stay on the meat while cooking.  It also adds a little more fat which is good for flavor and moistness. 
 
6.  Made To Order
 
A big part of what makes a good burger is that it is prepared to your specifications.  We all want what we want.  You are not going to get that at a fast food joint where they are just cranking out crap.  But you should be able to get a burger cooked the way you want it at a restaurant...and at a backyard cookout.  The most important part of the "how do you want yours" is correctly assessing the burger's doneness.  I've heard the boastful claims of using the finger test to gage the rareness or wellness of burgers and steaks.  "It's an art" so said.  Whelp, if true they are better than I then.  Me, I don't trust that method and who wants someone fingering all their food?  I have no idea where your finger has been. 
 
The only accurate way I know of for gaging internal cooking temperature is using a digital thermometer.   For goodness sakes, DO NOT cut into the burger (same for steaks).  You lose all the juiciness when you do so.  Digital thermometers range in prices from about $15 to $150.  It just depends on what you are using them for.  I have several.  Most of mine were bought for competition BBQ and smoking several different types of meat at one time.  I even have one that has a remote reader so I can be inside watching TV while monitoring temperatures.  You do not need any thing like these for just cooking burgers and steaks.  A simple probe and digital read out will suffice.  The less costly ones take a little longer to register and report temperatures but that is okay. 
 
As a general rule:
 
120 degrees is rare, red center, a little bloody.
 
140 degrees is medium, slightly pink center with gray. 
 
160 degrees is well done, all gray, minimal juice from fat rendering. 
 
My personal preference is medium rare (approximately 130 degree internal temperature).  It will be more pink in the center and very juicy.  With a digital thermometer you can cook yours and everyone else's made to order so to speak. 
 
Now how to cook the burger, griddle versus grill, I am really not going to get into here.  I love them both ways. 
 
7.  Juicy
 
Sorry char heads, meat should be juicy and this includes burgers.  A quick recap of things to do to ensure the juiciest burgers possible according to your liking:
 
1.  Form patties when the beef is at its coldest thawed temperature and then cook immediately.
2.  Do not over handle.
3.  Make a dimple. 
4.  Do not overcook.  Which means using a digital thermometer and not cutting into the burger patty. 
 
Another thing I can suggest here is to not beat your meat with a spatula while it is cooking.  Again, as the fat renders and the protein begins breaking down the larger patties may start to draw up and become more round then flat.  The tendency is to flatten them out by pounding them with your utensils.  You can only apply a little pressure and it is what it is.  If you over press your are pressing out all the fat which is the juice and flavor of the burger.  But now that you know the dimple trick, this will be a thing of the past. 
 
And I am not sure this tip fits here or under another category, but it's okay to flip.  Flip out!  Unlike BBQ where the rule is to never peek under the hood for the first 3 hours (it extends smoking time by at least 20 minutes each time you do), burgers you can peek and flip as much as you want really.  It really does not take that long to cook a burger and probably the more you flip them the more consistently cooked the burger will be on each side and throughout.   We have probably all made the mistake of leaving the grill and getting distracted only to slightly char one side and then put those patties charred side down on the platter to disguise them.  I cannot be the only one that has done that.  So when you are finally ready to cook your burgers, stand there, keep distractions to a minimum, and flip a way. 
 
7.  Don't Underestimate The Bun
 
A hamburger just isn't a hamburger unless it is on a bun (or at least between slices of bread).  It's how the originator, whichever one it was, invented it.  But it has to be the right bun for the right hamburger.  You do not want a bun too wimpy to handle the load and you do not want a bun that overpowers the patty or dwarfs it.  It is a delicate balance because the bun can make or break the hamburger.  If you are making smaller patties or sliders then a small white bread bun will suffice.  Larger burgers with toppings will take a sturdier bun or roll.    Butter your bun of choice and lightly toast it making the inside warm and supple and the outside slightly crunchy.
 
8.  Unlimited Toppings
 
If you like it, then pile it on.  There are no rules to toppings and you shouldn't let anyone discourage you from putting whatever you want on your burger.  It is a matter of taste and the flavor profile you want to make. And you can be as creative as you like too.  The combinations are endless.  When you think of the classic hamburger it consists of lettuce, tomato, onion, pickle, and cheese.  Just think about all the varieties there are for each of these toppings.
 
Lettuce: iceberg, romaine, spinach, green leaf, red leaf, kale...
Tomato: beefsteak, heirloom, plum, roma, and hundreds of other varieties...
Onion: white, yellow, red, pickled, grilled, sautéed...
Pickle: bread & butter, dill, gherkin, sour pickle, sweet pickle, relish...
Cheese: American, cheddar, pepper jack, provolone, feta, goat, blue cheese...
 
I only listed the basics for a classic style burger. These do not account for toppings like bacon, mushrooms, avocado, cream cheese, peppers; just to name a few. Sauces or condiments are also important and even the basics: catsup, mustard, and mayo have many different varieties. 
 
Toppings can be as simple or complex as you want to make them.  The trick (and fun) is finding the right combination of each that pulls it all together to complement your patty. 
 
And there you have it.  Some thoughts about what makes a good burger and some tips that I have learned along the way.  Do you agree?  What am I missing?  Please post your comments and suggestions.  I would love to hear from you. 
 
Time to get grilling!  I have hamburgers to make. 


Monday, January 20, 2014

And, The Most Worthy Wing Goes To...


 And so it begins.  Or ends.  However you want to look at it.  We have gathered together for one final round of judging to see who has the most worthy wings in all of Lawrence.  Our judges: me, Tailgate Ted on the far left, followed by Just Wings Judy, Al aka Heisenberg, No Nonsense Nancee, and Turbo Teri; your Wing Nutz ladies and gentlemen.  Cool shirts too that Nancee had made for us (thank you, Nancee). 


Our "tourwing" took us to 17 local establishments in Lawrence.  If you have been following us from the beginning you know that we excluded the national chains and wanted to support and promote local businesses and owners.  Lawrence is very fortunate to have so many great eateries.  When it comes to wings, there were five establishments that really separated themselves from the pack and so we are giving them one final go around.  That's right; a wing off!  Why a wing off? Why not?!  Besides giving us the excuse to get back together and pig out on wings again, we only hit these places one time and the scores of the top 5 are very similar.  This gives them another opportunity to show us what they got which will give us a bigger overall sample to judge.  
 
But before we begin, let us take a moment to look back and reflect on those that sacrificed so much in support of our passion for wings.   
 
 
 Carrot sticks are another good option with wings!

     Jefferson's and some serious celery stalks!


 Slow Ride - take it easy. 

 Johnny's Original.  I can smell the vinegar just looking at this!


 Set'em Up Jack's itty bitty wingy committee.


 Saints Pub.  15 out of 50 wings we sampled were broken.  This one was the most gnarly. The flavor and texture/tenderness of the wings were really go though.   

   
Paddy O'Quigley's

 You know my name...Heisenberg at Bigg's BBQ.

 Buffalo Bob's wings and curly fries special.


 6 Mile Tavern with shaved celery and carrots

 Thank you one and all.  Your sacrifice was not in vain. 
 

 And now to recap the overall standings; here we go:
 
17.    4.275  Biggs BBQ  Several broken bones, over smoked, texture and tenderness (TnT) not good.
16.    5.5      23rd St. Brewery  So much black pepper ruined them. Please, hold the pepper.
14b.  5.82    Paddy O'Quigley's  "O'Fail".  Good size, no heat.  Flavors didn't match description.
14a.  5.82    Wayne 'n Larry's  Many of the wings were overcooked that night.  Sauces okay.
13.    5.9      Set'em Up Jack's  Itty bitty wing committee.  Overcooked and dried out.
12.    6.075  The Bird Dog  Good size but no crunch to them.  Homemade buffalo sauce very mild.
11.    6.08    Slow Ride Roadhouse  TnT was hit and miss.  Flavors were so-so.
10.    6.53    Saints Pub   Flavors and TnT were great.  All the broken bones were not great!
9.      6.67    Johnny's Tavern (Original)  TnT was really hit and miss.  Basic Frank's Hot Sauce.
8.      6.84    Yacht Club   Really good sauces helped overcome lack of appearance and TnT. 
6b.    6.9      The Jayhawker   Good looking wings, flavorful, and tasty.  TnT a little inconsistent.
6a.    6.9      Dempsey's Irish Pub  Good flavors and prices. TnT a little inconsistent.
4b.    7.825  Jefferson's   Lots of great flavors.  Really good TnT.   Turbo double dipped!
4a.    7.825  Henry T's Like Jefferson's, great flavors, good TnT.  Get them with grill marks.
3.      7.94    Johnny's West  Lots of great flavors.  Classic and Flaming combined is really good.
2.      8.325  Conroy's Pub  They told us their wings were the best in Lawrence.  They could be right. 
1.      8.36    6 Mile Tavern  Booyah!  Crimson Fire sauce will light you up.  Smoky buffalo sauce.

As said before, there is a clear separation from the top 5 and rest of the field and so we selected these for our mighty wing off.  If you have followed us all along then you know we judged on 3 criteria: appearance, texture and tenderness (TnT), and flavor weighting each criterion.  Appearance only counts for 10% of the overall score, TnT 30%, and flavor being the most important had the heaviest weight accounting for 60% of the overall score.  But for the wing off we opted to have each judge simply rank each place they liked best from 1 to 5 and then assign a point value.  So, 1 = 5 points, 2 = 4 points, and so on.  The establishment with the most points accumulated is the winner of our little contest.  And in the event that there is a tie for first, then the highest original point score/ranking in the preliminary round is the tie breaker.  And now that you know and understand the method to our madness, onto the judging. 
 
Five places, one day to decide the most worthy wing.  We started early and paced ourselves throughout the day and evening taking breaks to watch basketball and football.  We split orders of wings amongst us too so that we would always be a little hungry leaving one place to go to another.  And in the end, we had a winner to declare, but honestly they are all really good! 
 
So, here it is:
 
Conroy's Pub comes in as the least favorite of today's top 5 wingers we visited with a score of only 7.  As said before, they do a classic buffalo style using Frank's hot sauce cut with butter.  Nothing wrong with that, but nothing special either.  The wings could have been crispier too today. 
 
Jefferson's is a great place for wings and things.  Lots of good sauces to choose from.  Our favorite is the Turbo Double Dip which is where they fry the wing, toss it in their Turbo sauce (which is extremely hot) and then put it back in the fryer one more time.  Most of the fire is cooked off and you are left with a very crunchy wing with great flavor.  We like to dip these in their hot sauce for a little extra kick.  Jefferson's received a 12. 
 
Johnny's West with their Flamingo sauce and Simmon's (hot sauce/BBQ combination) are top notch. Very good texture and tenderness.  Their wings definitely do not disappoint.  Johnny's scores an 18. 
 
6 Mile Tavern with their smoky, peppery twist on buffalo style sauce is something else and provides just the right amount of heat.  For the chili-heads, Crimson Fire will satisfy your quest for setting your taste buds aflame.   Consistently good texture and tenderness make these hard to beat.  And an honorable mention for their blue cheese dressing - the best we have had.  6 Mile Tavern comes in with a score of 19.  
 
Henry T's, the place where it all began for us and got us all fired up to go see if anyone could rival, let a lone beat them, as usual, did not disappoint.  Hot wings with their own original sauce, flash fried, sauced, and then thrown on the grill give the wings a nice little charred flavor and extra crunch to the bite.  They've been doing this a long, long time and they have it down.  And with that, T's earns a total score of 19 and they are declared, uh, tied?!
 
Yep, Henry T's tied with 6 Mile Tavern in our judges' rankings from first to worst of the top 5.  And since 6 Mile Tavern had the better overall score in the preliminary round, 6 Mile Tavern is hereby declared to have The Most Worthy Wing of 2013! 
 
Some will read this and demand a recount.  I checked and double checked!  Some will say there are discrepancies in how we score and confusion.  Nope, the process has fidelity and inter-rater reliability.  There are no hanging chads on these ballots and the scoring is fair.  
 
Honestly, they are all great and we were very critical judges throughout this entire process.  You really cannot go wrong with any of them!   And really, this whole thing was more about hanging out with good friends, communing, and sharing our passion for wings together.


And we ate a lot of wings...


  And then again, and again...


  And they were all good.  Bone lickin', lip smackin' good!

And we had a lot of fun doing it...


  And maybe even became a little closer to one another in the process. 


And that's really what matters! 
 
Thank you to everyone that followed me and my fellow Wing Nutz on our 2013 "tourwing" and congrats to 6 Mile Tavern.  They're a fairly new establishment in Lawrence next to Famous Dave's BBQ on Wakarusa and 6th Street.  Show them some love sometime and check them out. 
 
So now what?  Well, I still have this blog about grilling and tailgating that I had just started when it got hijacked by the crave to go eat wings all over town and tell people about it.  So, I will get back to that; recipes, advice, and sharing of ideas and experiences.  But I can already sense another food challenge coming on the horizon and maybe branching out regionally, so stay tuned! 
 
Until next time my friends,
 
 - "Tailgate" Ted